
 It’s ridiculous that I’m saying this on 27th January but; Happy New Year! It’s getting to that time of the month where Christmas and New Year are distant memories and New Years Resolutions have long been forgotten- my unofficial one was to blog more often: the fact I’m writing my first post of 2013 today shows how well that one’s going and is why I never make New Years Resolutions. Continue reading
Baking
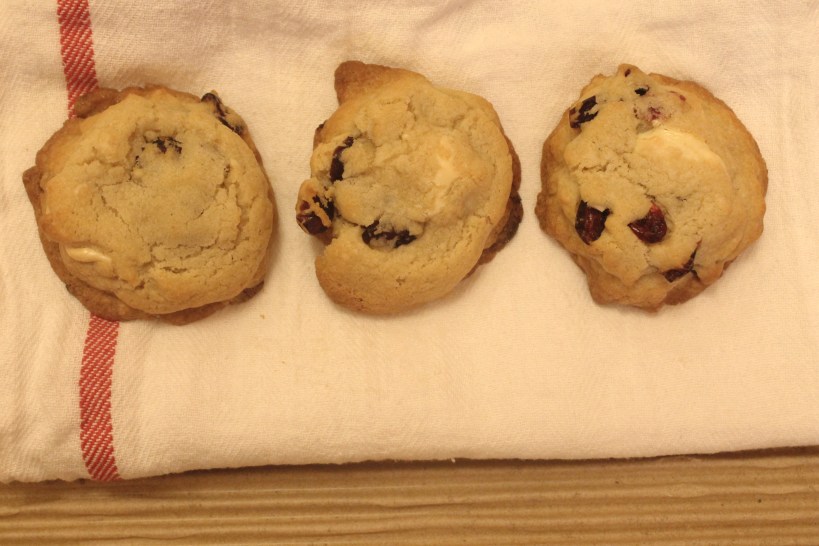
12 Tastes of Christmas: White Chocolate and Cranberry Cookies
An oven full of cookies has to be one of my favourite smells ever. And biting into a warm, soft, freshly baked cookie one of my favourite things ever.

White chocolate and cranberry is the perfect Christmas cookie. You can bake them as thick cookies, my personal favourite or, bigger, flatter ones (see recipe for how to make each) and the use of bread flour, which came about because I’d used up all our plain flour actually makes the cookies chewier in the middle which is just how I like them.
This recipe makes a lot of dough so it’s great if you have people coming over or if you want to give them as a gift and if not, make up the log/balls as you want to bake them and chuck them in the freezer ready to throw into the oven when you fancy one or when you have an unexpected Christmas visitor. Just add an extra 5 minutes to the cooking time if cooking from frozen.
Ingredients
250g butter, melted then cooled to room temperature
100g granulated sugar
250g light brown soft sugar
1 tbspn double cream
2 eggs
100g plain flour
200g strong white bread flour
1/2 tsp salt
1/4 baking powder
100g white chocolate chips
100g cranberries
Method
- Preheat the oven to 170° and pour the butter into a free-standing electric mixer with a paddle attachment. Add the sugars and and mix thoroughly on a medium speed until well incorporated then add the cream and mix again.
- Add the eggs one at a time, mixing well in between each, be sure to scrape around the bowl too to make sure that there are bits stuck on the bottom or sides that haven’t been mixed in.
- Sift in the flour, salt and baking powder in two halves, mixing well in-between each and again, scrape the bowl.
- Stir the white chocolate and cranberries through so they’re evenly dispersed the either:
– Roll the dough into a long log shape and put in the freezer until hard (about an hour) then, cut 2cm discs from it for big cookies.
or
– Shape the dough into small balls with your hands then flatten them slightly before putting in the fridge or freezer until almost hard (about 20 minutes) then put the balls onto a baking tray, placing two on top of each other then pressing them down slightly (see below) to form smaller, thick cookies.
5. Bake in the centre of the oven for 10-15 minutes.
6. Cool slightly on a baking rack then tuck in while they’re still warm.


LG x
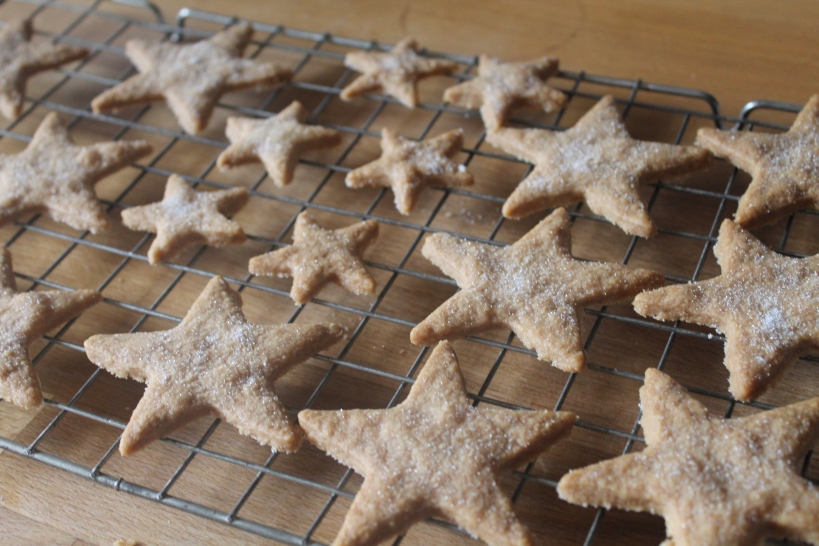
12 Tastes of Christmas: Festive Shortbread
These are really, really simple and easy to make and they look great. They can be eaten on their own as biscuits, served with desserts like mousses or, you can use a straw to make a little hole in the top before baking then thread a ribbon through it once cooked and hang them on your Christmas tree.
Ingredients
170g flour
a pinch of salt
115g butter
55g caster sugar, plus extra for dusting
Method
- Preheat the oven to 160° and grease a baking tray with butter.
- Sieve the flour into a bowl and cut the butter in to small pieces before adding that to the bowl.
- Rub the butter and flour together until it resembles breadcrumbs. Mix in the sugar and lightly knead until it comes together in a ball of dough. On a floured surface, knead until smooth.
- Roll out the dough until it’s about the same thickness as a pound coin, then using a star (or any other shaped) cutter, cut biscuits out of the dough and carefully transfer to the baking tray with a palette knife.
- Cook for 12-15 minutes. Remove from the oven, place on a rack to cool and dust with sugar or icing sugar.
- Eat!


LG x
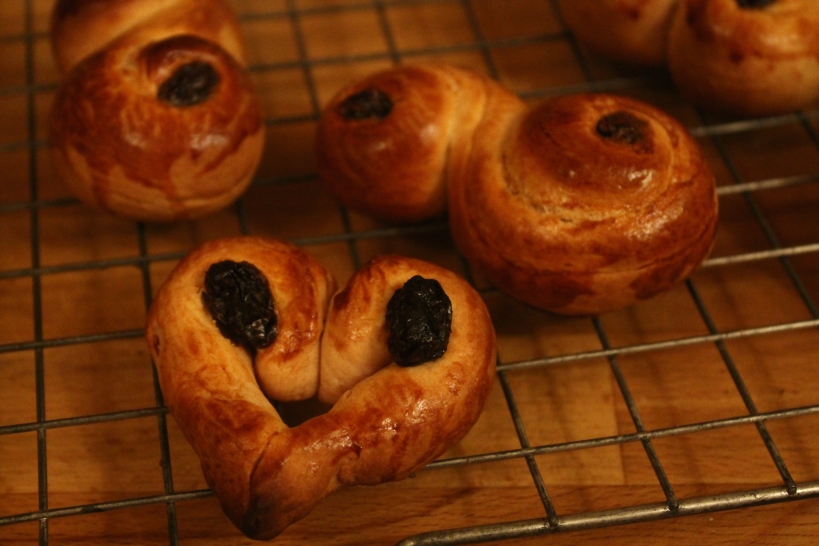
12 Tastes of Christmas: St. Lucia Buns
 I’m a bit of a hoarder. Not so much of stuff but of stuff like presents; I finished my Easter egg about a month ago, I’m still eating last Christmas’ chocolate coins and I have a Topshop voucher in my purse that despite buying at least two things in there since I’ve had it, I’m still insistent on ‘saving’. And until last night, I had a packet of Saffron that my sister had bought me from Morocco last Christmas that I was yet to use.
Today it St Lucia’s day and it’s tradition in Sweden that these Saffron buns, (St Lucia Buns, Lucia Cats or Lussekatter) are made and eaten to celebrate, someone gave me a recipe for these and I decided it was time to part with the saffron and make them.
I’ve had a bit of trouble with them rising but I think that’s probably due to the fact that me and fast action yeast have never gotten along and it didn’t affect the crumb too much so I was pretty happy with them in the end and although they’re not something that we traditionally associate with Christmas in this country, they do taste pretty Christmassy and I will definitely be making them again next year. They’re quite difficult to describe, the recipe looks similar to that of a brioche but they’re not as delicate or soft and the saffron adds a different flavour and although they have sugar in, they’re aren’t really sweet. They’re best eaten fresh from the oven as they are or with a little butter.
Happy St Lucia’s day!
I’ll be back tomorrow with the next recipe in my Christmas series, not long to go now!
Ingredients
150ml milk
1g saffron
1 sachet of fast action yeast
75g caster sugar
50g butter
350g plain flour
1 tbspn natural yoghurt
1 egg
a few raisins
Method
- Preheat the oven to 190°. Heat the milk and saffron in a pan over a low heat, once warm, add the butter and stir until it melts. Don’t let the milk reach simmering point.
- Put the yeast into a free-standing electric mixer with a paddle attachment and pour the liquid mixture over it. Add the yoghurt, sugar and sift in the flour. Mix until a smooth dough forms. Remove the bowl from the mixer, cover with a cloth and leave to rise for half an hour.
- Change the paddle attachment to a dough hook and return the bowl to the mixer, knead on a medium speed for about 3 minutes.
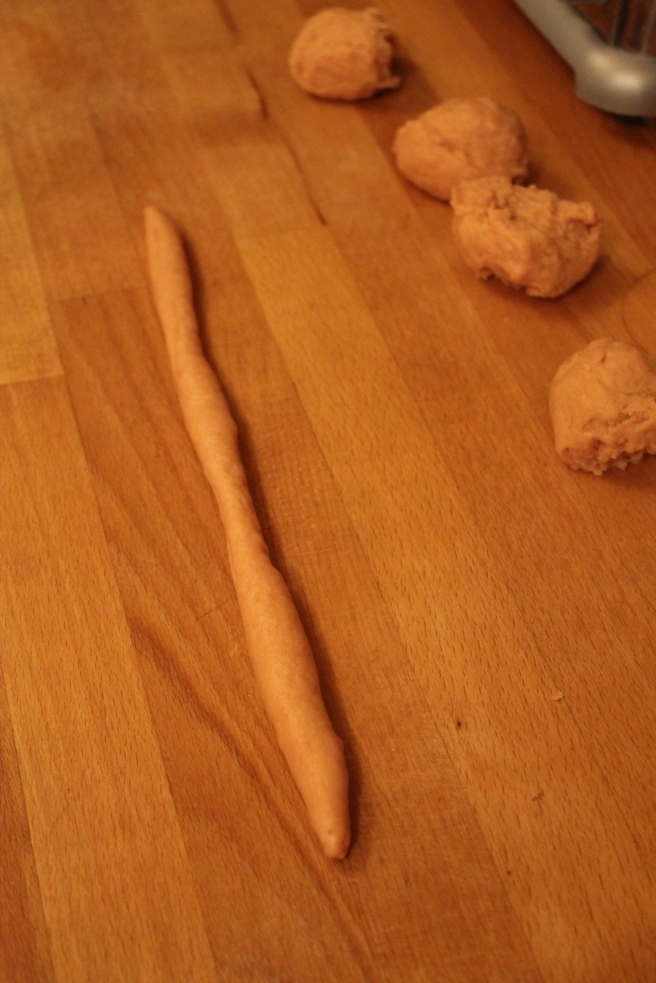
- Divide the dough in half, then divide those halves into halves and then divide those quarters into halves so you end up with 8 equal pieces of dough.
- Roll each piece of dough into a long strip of dough (see below) and then shape traditionally they’re shaped into an infinity sign or figure of eight, whatever you call it and are also often made into swirly ‘S’ shapes but i made a few different shapes and they all worked fine (again, see below) so you can shape them into whatever you fancy.
- Press a few raisins into the dough, cover with a piece of cloth and leave to rise for 20 minutes.
- Whisk the egg and brush the buns with it, place on a baking tray and bake for 10-15 minutes.
- Eat!


LG x
Lemon, Lime and Poppyseed Loaf

It was a while ago now that I got our food processor out to make something and had the trauma of finding out that it was broken. Although, as a believer in every cloud having a silver lining, I got a bit over excited at the prospect of replacing it with a KitchenAid or Kenwood Chef. I had a couple of weeks of bicep building baking without a mixer and then, one grey, cold, maths revision filled Sunday a few weeks ago my Mum and Dad came in the door with the Kenwood free-standing mixer that my Mum and I had been wanting for rather a long time.
As pretty and sparkly as it looked in its newly made home, in pride of place by the oven, I had to use it as soon as I could and this was the first recipe that came to mind, I adapted it from a magazine cutting that someone gave me a few months back- I am admittedly not the quickest at getting through my ‘to-bake list’ but my excuse is that it’s not as long as my arm but way longer- and I loved it. When I’m face with a choice of what dessert or cake to pick, I always go with whatever has the most chocolate in but, recently I’ve definitely become more of a lemon fan, this being one of the reasons.
Ingredients
125g soft butter
150g caster sugar
3 large eggs
150g self-raising flour
1 tsp baking powder
pinch of salt
1 lemon
1 lime
4 tbsp poppy seeds
50g icing sugar
Method:
- Preheat the oven to 180° and line a loaf tin with greaseproof paper, line it lengthways and leave an otherhang at either end to make it easy to pull the finished cake out once it’s cooked.
- Cream the butter and sugar together in a free-standing electric mixer (yay!) or with an electric mixer until light ad fluffy.
- Add the eggs, one at a time beating well between each one.
- Sift the flour, salt and baking powder into the mixture, folding it in carefully then grate in the zests of the lemon and lime.
- Stir in the poppy seeds then tip the mixture into the loaf tin and bake in the middle of the oven for 30-35 minutes.
- While it cooks, put the icing sugar into a small bowl, squeeze in a tablespoon on lemon juice from the lemon, mix well and add it little more if needs be, add just enough to make a runny icing.
- Check the cake is cooked by inserting a skewer and checking whether it comes out clean. Once cooked remove from the oven, leave to cool in the tin for about 5 minutes then tip onto a wire rack, drizzle with the icing and leave to cool.
- Eat!


Tre-Colore Stuffed Focaccia
I have a tendency to start feeling really awake late at night, normally right as I’d like to drift of to sleep. I start thinking about things I  need to do, making plans and formulating ideas in my head. One night a couple of weeks ago I was turning over ideas in my head of the first thing I could make using our new kitchen toy would be and having read an old blog post somewhere on the internet about last year’s focaccia task on The Great British Bake Off and fancying something a bit different, the idea of a stuffed focaccia came to mind. After a it of thinking, I came up with taking the traditional Italian ‘Tre Colore’ salad’s flavours and putting them into a foccacia which by the way, is one of my favourite breads. When I was making it, I got thinking about pesto and realised that it actually deserved its own post rather that being part of this one and I do break the golden ‘don’t cook pesto rule’ and would probably get an angry earful from some Italians but, it still tastes good so maybe I can be given the benefit of the doubt this once…
The recipe for the bread is done using a free standing mixer and dough hook as that’s how I did it but I’ve made focaccia by hand plenty of times before, it just takes a bit more elbow grease and arm strength to do the kneading by hand but it can be done.
Ingredients
For the bread…
350g strong white bread flour
1/2 tsp salt
1 sachet (7g) fast action yeast
210ml luke warm water
20ml olive oil
To Stuff…
1 ball mozzarella
2tbsp pesto (Recipe here)
handful of cherry tomatoes
Method
- Lightly oil a 9″ round, preferably spring-form, cake tin. Put the flour, salt and yeast into the bowl of a free standing electric mixer (or a large mixing bowl by hand if you don’t have one) fitted with a dough hook, gradually mix in the water an oil on a low speed.
- Knead for one minute on minimum speed then for 4 minutes on the next speed up, until the dough is smooth and elastic.
- Remove the owl from the mixer, cover with oiled cling film and leave in a warm place to rise for about 1 hour or until doubled in size. Meanwhile, prepare the filling by making the pesto, slicing the mozzarella and tomatoes.
- Return the bowl to the mixer an knock back on minimum speed for about 60 seconds.
- Transfer to an oiled surface, split in to two roughly equal balls and roll out as thinly as possible.
- Line the bottom of the tin with the first disc of dough, pushing it up he sides slightly, spread it with pesto then scatter with the mozzarella and tomato.
- Take the second disc, lay it over the top and push the edges down so they meet the edges of the first disc, press them together so they form a neat join.
- Cover and leave to rise for a further 20 minutes, meanwhile preheating the oven to 200º.
- Uncover the dough, sprinkle with sea salt and drizzle with oil then bake for 25-30 minutes.
- Cool slightly on a wire rack then serve warm- it can be eaten cold, I have mine cold the next day but it does taste better warm and fresh from the oven!


LG x
Wear it Pink
![]()
October is breast cancer awareness month and Friday is Wear it Pink Day which aims to raise funds to help Breast Cancer Campaign’s research, the idea is that everybody wears something pink on Friday to raise awareness, donate £2 to help with pioneering cancer research and join in fundraising events. Of course one of the best ways to raise money whether it’s at your office, school or with your friends, is with a cake sale so I’ve put together a few of my favourite ideas for pink baking:
- Pink Velvet Cakes– Replace the red food dye in your favourite red velvet recipe with pink food dye.
- Pink and Pinker Battenberg– Follow the classic battenberg recipe, using light pink food dye for one sponge and dark pink food dye for another.
- Pink Hearts– Melt white chocolate, add a little pink food dye and pipe hearts or squiggles onto greaseproof paper, cool and then use to decorate you favourite cake or cupcake.
- Pearls– Top your favourite cupcake with little pink pearl decorations.
- And don’t forget to rock your favourite pink socks, scarf, nail varnish, apron or top on Friday!
Head over to the Wear it Pink website for more information and take a look and my Wear it Pink board on Pinterest for even more ideas.
LG x
NB. Photo credit, http://www.wearitpink.co.uk/
National Baking Week
Tomorrow marks the first day of National baking Week which obviously means everybody has to bake so to inspire you, I’ve rounded up all my baking recipes from my blog.
I’m not sure what else these is to say apart from, in the words of Sue and Mel, Ready, Steady, Bake…


LG x
Skinny Chocolate Cake
Well it’s been a while, as tempting as it may be, I haven’t been hibernating. Unless that long nap I had to take after eating my 5 Birthday cakes (Not all in one sitting, obvs) counts. Unfortunately I’ve just been getting used to being back at school and enjoying all my coursework…
Anyway, the days are getting shorter, and darker, and colder, and that means no more going out and enjoying the  sunshine so what you might be wondering, can you do instead? Bake. Baking is the answer. It normally is but it’s most definitely the best autumn hobby ever because having the oven on warms up the house (or kitchen at least), the stuff you’ve baked makes everything seem a bit less depressing when you eat it, the smell is way better than summery flowers and of course, we have the Great British Bake Off to inspire us. The only problem is that sitting at home eating cake every Sunday afternoon (Or every afternoon full stop) until the sun shows up again might leave you in need of an entire new summer wardrobe when that time comes. But i have that covered too, low fat, rocky road style chocolate cake is the answer.
I will be the first to laugh at anything low fat. I’m more of a believer in eat something that actually tastes nice and go for a run but, believe me, this tastes just as nice, if not better than normal chocolate cake and to make it even better, this has around 4g of fat per serving ( and 177 calories) as opposed to normal chocolate cakes which tend to hover around 30g per serving mark.
Ingredients
250g plain flour
120g cocoa powder
1 tsp baking powder
2 tsp bicarbonate of soda
200g caster sugar
pinch of salt
2 eggs
380ml skimmed milk
160 ml coffee (Preferably espresso)
100g (about one medium size) banana, mashed
To Finish
100g walnuts
100g raisins
50g mini marshmallows
50g dark chocolate
75g light cream cheese
Method
- Lightly grease a 9inch square cake tin with a little vegetable oil and preheat the oven to 180°.
- Sieve the flour, cocoa powder and raising agents into a large bowl. Add the sugar, salt and eggs and mix.
- Gradually mix in the milk then add the banana and coffee and mix until well combined.
- Pour into the cake tin and bake in the middle of the oven for about 30 minutes or until a skewer comes out clean when inserted into the middle of the cake.
- Once cooked, leave to cool slightly then turn out onto a serving plate or board. Cut to top off (It’s likely that it will resemble a volcano at this point) and sprinkle the marshmallows over what is now the top of the cake.
- Leave to cool for a while, this will allows allow the marshmallows to melt. Meanwhile, melt the dark chocolate over a bowl of boiling water or in the microwave then stir in the cream cheese. Lightly spread this mixture over the top of the cake.
- Crumble the cake that you’ve cut off the top into a bowl and add the walnuts and raisins then scatter over the cake.
- Eat!


LG x
Baby Banana Breads
First off, sorry this post has taken so long, someone’s decided that end of term  now means get as much work done as possible, not do nothing so I’ve had about a million pieces of coursework to finish and haven’t had much time to cook (well, more that I haven’t had enough time to take photographs!).
I’ve been craving some good banana bread for ages as I haven’t had any in forever and I found my mini loaf tins in my baking draw when I was rearranging it, it looked in my sisters words ‘like a car crash’, so I thought mini banana breads would be cute, obviously you can make a big one if you don’t have the baby loaf tins or make them in muffin cases, either way they should taste good!
Ingredients
350g plain flour
½ tsp salt
1 ½ tsp baking powder
½ tsp bicarbonate of soda
2 tsp cinnamon plus extra for dusting
140g caster sugar plus extra for dusting
350ml milk
1 tbsp greek yoghurt
2 tsp white wine vinegar
1 egg
75g butter, melted
3 medium peeled and mashed bananas (Or about 400g)
Optional: Walnuts to finish
(Makes about 8 small loaves or 1 large one.)
Method
- Put the white wine vinegar, yoghurt and milk into a jug and leave to stand. Put the flour, sugar, raising agents and cinnamon into a bowl and mix together with a wooden spoon or handheld electric whisk until well combined.
- Add the egg to the milk jug and mix together until combined. Slowly add it to the flour mixture and mix until all the ingredients are well incorporated.
- Pour in the melted butter and beat until it’s well mixed in then add the mashed bananas and mix ensuring they’re evenly dispersed.
- Spoon the mixture into your tins and sprinkle with a little more cinnamon and sugar and a walnut if you wish.
- Bake for 15-20 minutes for small loaves or 20-30 for a large loaf.
- Eat!


LG x
